Appendix 2b: Illustrative Games Part 2
We used a few moves from the first match game between Blackburne and Lasker earlier (Diagram 6 in the main section) to show why you must make sure that candidate moves suggested by square counting are tactically sound. The rest of the game is worth playing over because your opponents will make the same mistakes that Lasker's did, assuming of course that you can play them into the same kind of position.
Lasker was not yet world champion, but he had already beaten the older player twice, a month or so earlier, during a London tournament. Blackburne had blundered in both games and Lasker could expect him to blunder again.
Here's the full game, Blackburne vs. Lasker, London 5/27/1892
Match Game #1
Ruy Lopez
Note: If you want to look at the square count, move by move, download in PDF form or in Spreadsheet form for the White and Black square count, or view it in your browser.
| 1 | e4 | e5 |
| 2 | Nf3 | Nc6 |
| 3 | Bb5 | Nf6 |
| 4 | d3 | d6 |
| 5 | N1d2 | g6 |
| 6 | Nf1 | h6 |
| 7 | c3 | Bg7 |
| 8 | Be3 | a6 |
| 9 | Ba4 | O-O |
| 10 | h3 | b5 |
Diagram 1
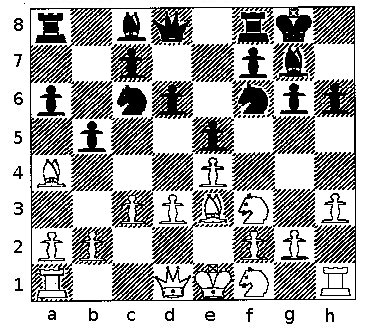
Position after 10 .... b5
| 11 | Bc2 | d5 |
| 12 | g4 | Qe7 |
| 13 | Ng3 | dxe4 |
| 14 | dxe4 | Rd8 |
| 15 | Qc1 | Kh7 |
Diagram 2
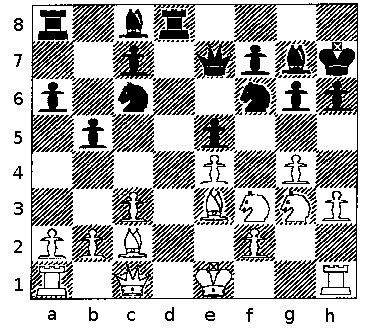
Position after 15 .... Kh7
At first I found this game very difficult to write about, because it seems to contradict two points that I want to make - that square counting is an effective tool both for generating candidate moves and also for predicting when you should start looking for a good combination. And it's right around here that I started scratching my head.
Black is ahead in squares. In fact he's up 9, but White is attacking. What's going on?
It took me a while to remember that this is not one of my own games, but is between two independent players, neither of whom would have wanted my advice. Blackburne focused on Lasker's king, forcing Lasker to keep his own pieces nearby. Blackburne wanted to attack, but he wasn't able to overwhelm Lasker's position because Lasker controlled too much of the board.
| 16 | g5 | Ng8 |
| 17 | gxh6 | Bxh6 |
| 18 | Ng5+ | Bxg5 |
| 19 | Bxg5 | f6 |
Black is up 12 squares here, but White is still after Black's king. The puzzle deepens.
| 20 | Be3 | Na5 |
See Diagram 3
Diagram 3
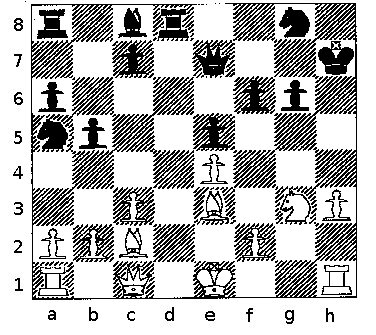
Position after 20 .... Na5
| 21 | b3 | Nc6 |
| 22 | Ne2 | Be6 |
Black is up 16 squares but White seems determined to go for checkmate.
| 23 | f3 | Rd7 |
| 24 | h4 | Rf8 |
Now Black is up 11.
| 25 | Kf2 | b4 |
And now Black is only up by 3 squares. White is starting to pick up territory.
Diagram 4
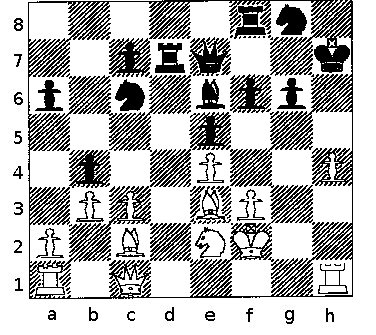
Position after 24 .... b4
| 26 | c4 | a5 |
| 27 | Qg1 | Qe8 |
| 28 | Qg2 | Nh6 |
| 29 | Rad1 | Rxd1 |
| 30 | Rxd1 | Rf7 |
For some reason, Blackburne held back from pushing his rook pawn, spurning Fischer's not yet given advice to push it, open the file, and sac, sac, and mate.
Diagram 5
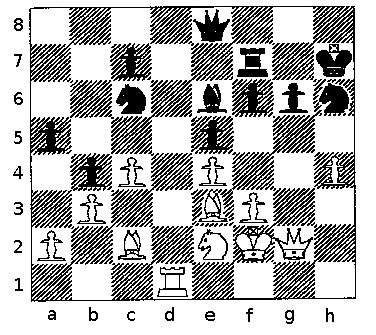
Position after 30 .... Rf7
| 31 | Qg1 | Bc8 |
| 32 | Nc1 | Qe6 |
I'm guessing that 1) Blackburne realized that his attack isn't strong enough, and that 2) Lasker set a little trap to avoid a draw.
| 33 | Nd3 | f5 |
This is where we met Blackburne in the main article. Maybe he's getting a little nervous, figures it's time to swap.
| 34 | Nc5 | .... |
Half a league onward.
| 34 | .... | Qe7 |
| 35 | Qg5 | .... |
Into the valley of death.
| 35 | .... | f4 |
Someone had blunder'd.
If the bishop tries to get away from the pawn, the knight goes, but if the bishop stays, it gets taken with check. In either case White loses a piece. He should have played Qg5 one move sooner.
Diagram 6
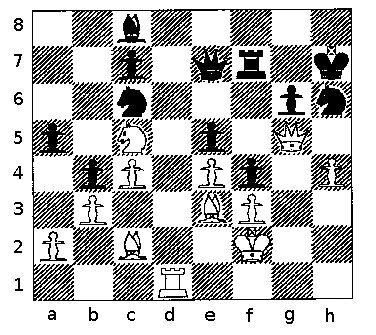
Position after 35 .... f4
| 36 | Qxe7 | fxe3+ |
| 37 | Kxe3 | Rxe7 |
| 38 | Rd5 | Nf7 |
| 39 | Nd3 | Kg7 |
| 40 | f4 | Bb7 |
Diagram 7
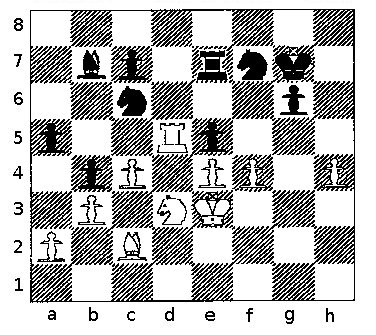
Position after 40 .... Bb7
The game was over after the thirty fifth move, but Blackburne wasn't known for resigning.
| 41 | Nc5 | Nd4 |
| 42 | Nxb7 | Nxc2+ |
| 43 | Kd3 | c6 |
| 44 | Rxa5 | Rxb7 |
| 45 | Kxc2 | exf4 |
| 46 | Kd3 | Kf6 |
| 47 | e5+ | Nxe5+ |
| 48 | Ke4 | f3 |
White Resigns
Diagram 8
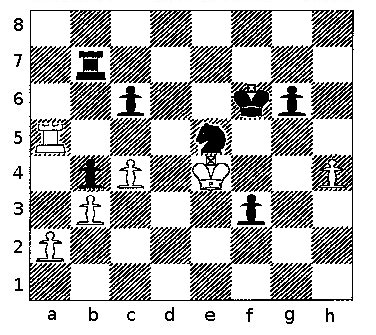
Position after 43 .... f3
This is the kind of move you should expect if you don't resign when you should.
What can we learn from this game? Does it invalidate square counting?
No. In fact, square counting would have helped Blackburne, who had to jump through hoops to get his queen into play, and then lost when he succeeded. Lasker's control of the queen file played a big role, as did Blackburne's decision to put his queen on c1 instead of e2. Lasker built up a superiority in space, beat back Blackburne's attack, and won the game. It boils down to this: when you have a chance to make a favorable combination or to go on the attack, do it. When you don't, try and gain territory.
Blackburne repeated the opening in the ninth game of the match, but took the knight on c6 and kept his queen in play, and was able to draw.
I've tried playing the d3 Lopez, sometimes taking the knight, sometimes not, sometimes castling king side, sometimes queen side, and occasionally not at all, but for some reason I've never been able to whip up beautiful attacks the way, for example, Anderssen could.
I was introduced to this opening years ago by a friend who was a better player than me, and who discovered the system and embraced it enthusiastically, then told me about it, and shortly afterwards dropped it like a hot potato when he found a win by Karpov as Black which he couldn't refute. I'm more loyal to my openings, figuring that if I ever play Karpov, I'll play something different. Still, even I have my limits.
I used to play the Wing Gambit. After all, Marshall did pretty well with it, but I lost so many games that I put it aside for a while. Then one day I ran across a game where Capablanca played it against Black (literally) and I decided to study his winning methods. Well, he didn't have any winning methods. Capablanca got crushed just like me, and neither of us ever played it again.
I mentioned earlier that I wouldn't be too sure that Lasker didn't use some form of square counting. Before you dismiss the idea out of hand, consider. Lasker's distant cousin Edward introduced Emanuel to Go, which seems to me to be the ultimate property game. This happened years later, but the interest was latently present, and Emanuel took to the game avidly. Edward, in one of his books, mentions that he himself had come up with a theory based on calculating the potential energy of the pieces. And finally, Emanuel's Manual of Chess explains that the familiar 9, 5, 3, 3, 1 set of piece values correspond to the effective amount of territory each piece controls.
Let's close shop with some Tactics. Lasker's games have lots of little mini-combinations like the one he used against Blackburne. Tricks like luring the knight to c5, where it becomes a sitting duck. You shouldn't show this to your mother, but one of Lasker's best suggestions was that you should put a little drop of poison into every move that you make. By the way, Lasker won the match with 6 wins, 4 draws, and 0 losses.
GM Andy Soltis wrote a great book about Lasker, called Why Lasker Matters (Batsford). He also wrote another great book, one about Frank Marshall (McFarland). Actually, anything by Soltis is a good read because he's such a good writer.
The tournament book for Hastings 1895 (Dover) includes Blackburne's games from that event and a brief biography which points out what a good player he was in his prime. It has pictures, too.
Return to Main Article - How to Play Chess Well
Appendix 2a
Return to Chess Main
